The next chapter in our post-mortem series on XO’s Kickstarter:
* * *
Having heard too many horror stories about Kickstarter reward costs running wildly over budget, I set out to create a planning tool to help us project all of the reward costs in our campaign. After a lot of trial and error, I present to you… Kickulatron! It may seem overwhelming at first, so don’t run away in fear… it’s a just spreadsheet.
Kickulatron comes loaded with the final data for our Kickstarter campaign: our backer tiers, rewards and the calculations I used and our actual pricing info. In this article I’ll also be interspersing commentary about our Kickstarter campaign from a business standpoint and attempting to explain the thinking behind our rewards.
It’s free to download here
Some caveats: there may be grievous errors in the spreadsheet. Use it at your own risk, and double-check the math. Do your own research on all the costs; we got discounts based on relationships, negotiations, and in some cases the proper application of snacks. Our internal costs to produce the Kickstarter campaign were a lot higher than this – making the trailer, marketing, and development hours to support the campaign aren’t included; this spreadsheet was created to track reward costs, not the cost of putting on a Kickstarter campaign.
Getting Started
So here’s how you should use the thing.
First rule: make changes to cells with a yellow background, lest ye rouse the error dragons. The other cells are have formulas or pull data from other tabs.
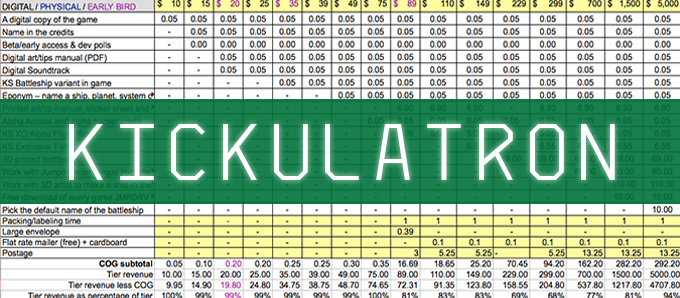
There are several tabs in this spreadsheet. The first tab is the Reward Matrix. In column A, input the names of each individual reward. In columns B-Q, put a capital X in each reward tier that should get the reward. I highlighted our early bird tiers in purple, and physical rewards in blue to make them stand out more.
The tiers were carefully structured to give our backers incentive to contribute ‘just $5 or $10 more.’ As you can see on the summary tab, a backer moving from the $10 tier to $15 or $20 added a large amount to our development funds and almost nothing extra to our overhead.
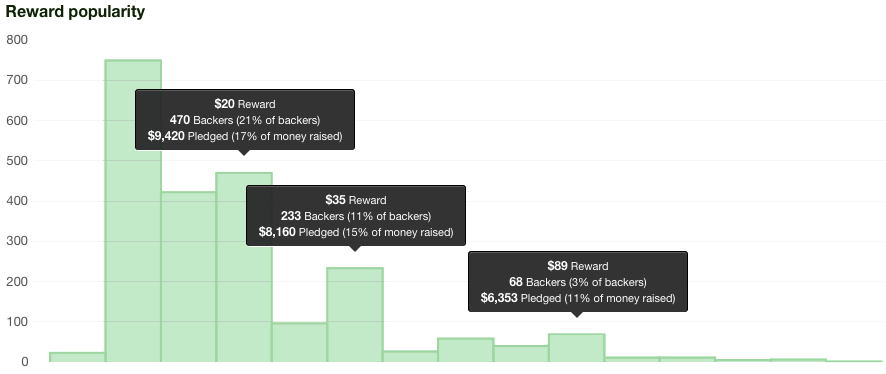
After analyzing many campaigns, it seemed that tiers over $100 were only successful with established studios, and that the bulk of money raised was in the $25 to $30 range. So as a new studio I focused primarily on the lower tiers. I’m glad I did; 90% of our backers were in the lowest five tiers. The ‘just $5 more’ strategy paid off: around 34% of our backers were in the first ($10) tier, but roughly 40% of our backers were in the second and third tiers. We had a nice uptick of backers increasing their pledges in the last few days as well. That’s partly because Corey sent a few emails to the lower tier backers during the campaign to encourage increasing their pledge, but the pricing definitely contributed.
Similarly, the early bird structure was designed to entice increased pledges and smooth out the price gaps between the tiers. The $20 and $35 tiers were very effective in this regard. It’s harder to say whether or not the $89 tier was structured exactly right, but we’re still really happy to have those Alpha backers. Kickulatron helped me see that offering this tier at $21 less as an early bird was still bringing in enough revenue to the studio to justify the discount.
We debated whether or not to use any ‘Magic 9‘ pricing as it is somewhat controversial. In the end, convincing marketing data and the fact that we were giving backers a $1 discount on any Magic 9 tiers won out, and I added several tiers with magic 9 pricing.
On to the next tab… and guess what goes on the Tier names tab? That’s right, tier names! It’s a bit of a mish-mosh, but the idea was to have the tier name echo the rewards you would get, and also attach an increasing amount of status as the tiers went up in value. I’m not sure it made a difference, but it made us feel good.
Cost of Goods
Next we have the admin and design costs tab. This part is solely for costs to create each reward. Yes, we have to spend time /making/ these rewards!
Underestimating the cost of creating a reward, whether it is a digital or physical reward, has frequently come up in other Kickstarter postmortems. I took the time to break each reward down into discrete buckets, and I’m thanking myself for doing that now, because over 95% of our backer rewards are digital only. Here’s the buckets I used:
- Administration time is a grab-bag for the boatload of work outside of the other categories. Things like dorking around with Kickulatron trying to determine the right pricing, and your valuable time wearing the Producer hat making sure all of the work gets done.
- The Research column is for time spent tracking down production costs and materials, and the significant time you’ll spend looking at other Kickstarter rewards.
- Design includes concepting and refining the reward.
- Layout is time spent working with publishing tools to produce print or screen-ready materials.
- Art is time to develop any necessary artwork.
- Dev is any programming time required.
- Third party coordination covers time spent working with other parties like external artists, manufacturers, shippers.
- And lastly, the ever popular ‘screen for appropriateness’ is a place to add time you’ll need to make sure, when you allow backers to name things in your game, that you catch the naughty or inappropriate bits.
On the next tab, cleverly named “Single item costs per reward,” we are concerned with the costs to produce a single item after the prototype or final artwork is ready. So naturally, Unit Cost is probably the most important column here, but I found a couple of exceptions that are worth discussing.
Obvious tip of the day: shipping is not only expensive, it’s also super time-consuming. Fortunately Corey has years of experience shipping small packages and designing cool but inexpensive goodies. Using his experience we planned our rewards to fit in a single envelope, and estimated each item’s weight carefully. We threw out rewards that wouldn’t fit — unfortunately that meant we wouldn’t have a gigantic battleship-shaped pillow. For this reason, our packing and envelope costs are reflected on the cost per tier tab, instead of this tab. However, our 3D ship model will ship from EUCL3D so there’s a separate shipping cost. I added an individual shipping column here to make sure that special shipping cost was reflected for each 3D model sold.
We also have a printed letter of thanks we’re sending out to backers at a certain tier, so I made sure to capture the time for each person on the team to personally sign each letter (thus the three $0.10 line items for that reward). Is it insane to track a ten cent line item? Not when you might be fulfilling thousands (or potentially tens of thousands) of items!
Art and design time is only for the higher priced tiers that have a single backer working with us to create unique events or ships. From what we’ve read, backers tend to be easy to work with for these kinds of things, so I went low on those estimates.
Lastly on this tab I wanted to track the fraction of time it would take to import spreadsheets, cross-check names in the reward spreadsheet, send out emails, and other miscellany – that goes in the Admin column. I decided not to add the cost to administer beta and dev polls because I think we’ll get great feedback from our backers and use it to improve the game – that makes it a development expense, not a reward. Lastly on this tab, the higher admin time on the most expensive rewards reflect the appropriate amount of customer service time I expect for making sure these very important backers get their rewards exactly as they hoped.
Delivery
The “Cost per tier, USA” tab is where you adjust each tier’s price and add in tier-level shipping. I had to be careful here, because this tab only calculates the per-item cost, leaving out the data on the Admin and Design tab. I kept reminding myself that it’s impossible (for my monkey brain at least) to perfectly calculate admin and design costs on this tab, because you will likely have multiple tiers and multiple rewards per tier, and admin and design costs are spread across every tier. So all that data is instead show on the Summary page.
But this tab is still a valuable place to make sure the money you are raising per tier is what you want it to be. You can really see from our data what a hit we take as our tiers increase in price. I’ll have to wait until after the game launches to see how well shirts and 3D printed models sell before making up my mind, but if you’re not thinking of selling merchandise, this tab makes it really clear how much more it costs to fulfill physical rewards. By including physical rewards, I basically decided to open another line of business.
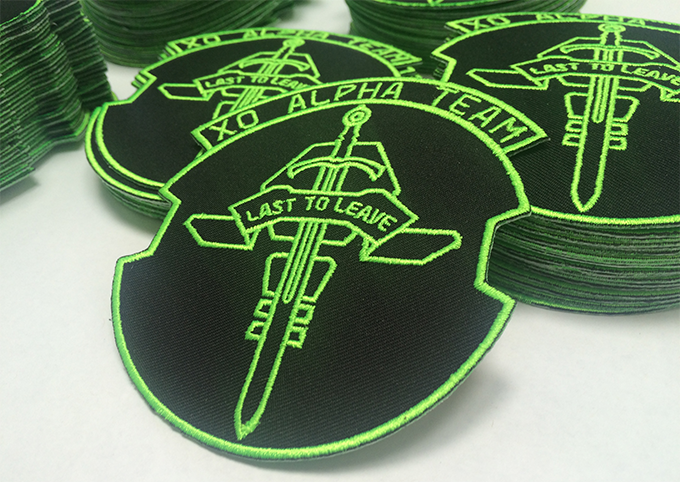
Corey and I debated often on whether or not to have physical rewards at all. We agreed that we would probably get higher pledges with them. With the exception of the Alpha patches, I decided to offer non-exclusive physical goods because the production costs were too high unless we could sell them elsewhere.
I spent a lot of time on this tab, playing with what the backer would pledge for each tier, and going back and forth between this and the Reward Matrix to find the right mix of rewards that would feel like good value for money without dramatically reducing the money raised for development.
And here is where I made adjustments for individual packing and labeling, envelope costs, a piece of cardboard to stiffen our envelope and protect the contents, and postage for shipping out one unit of each reward tier.
International shipping costs aren’t reflected on this spreadsheet. This was quite the adventure to research and understand. TL;DR, I opted to ship USPS International First Class Package Service. The USPS website sort of cleverly hides the cheaper First Class option and defaults to Priority Mail International, which is at least $10 more per item! You have to pay VAT if the value of an item is over a certain amount – over £15 (~$20) in the UK, to the EU €22 (~$25). That’s not based on the entire pledge, just the fair and reasonable value of the item so having exact production costs for each item was quite helpful. You also have to pay duty if the value of the item(s) are over a certain amount (around $150). None of our tiers, except the 3D printed model had a value of over $20, so I calculated that we could reasonably ship any tier for the cost of a box for $1.85, about $8 for our time to deal with customs forms and the post office, and USPS First Class International postage of $16. That’s still a lot of money.
Staying Flexible Without Knee-Jerking
During the campaign this spreadsheet was a massive time saver. After we launched, some backers asked for a lower priced 3D ship model tier. I was able to quickly and confidently cost out a $229 tier. Once I had a price structure that worked for us, we floated the idea out in the Kickstarter comments and got positive feedback, so I added the tier. Like many special requests on Kickstarter, this new tier didn’t perform as well as I’d hoped, but at least it didn’t take long to do.
Some people asked for add-ons during the campaign – most often the t-shirt. The thing about add-ons is that they force you to turn your Kickstarter campaign into a store, rather than an avenue for raising development funds. I could have priced a t-shirt at $50, but I didn’t think we’d have many takers, and it may have backfired and annoyed people. I decided before the campaign started that offering add-ons would have blown our carefully crafted pricing structure to smithereens, greatly increasing the time and cost to fulfill rewards and not adding meaningfully to the bottom line, so I didn’t do it. Thus, there is no way to account for an add-on in Kickulatron.
Summary
The best tab is the last. Here you’ll find a summary of the most important details; how much money your campaign could raise, how much Kickstarter will take, your total cost for rewards and that all-important bottom line: how much you’ll have for developing your game… if everything goes to plan.
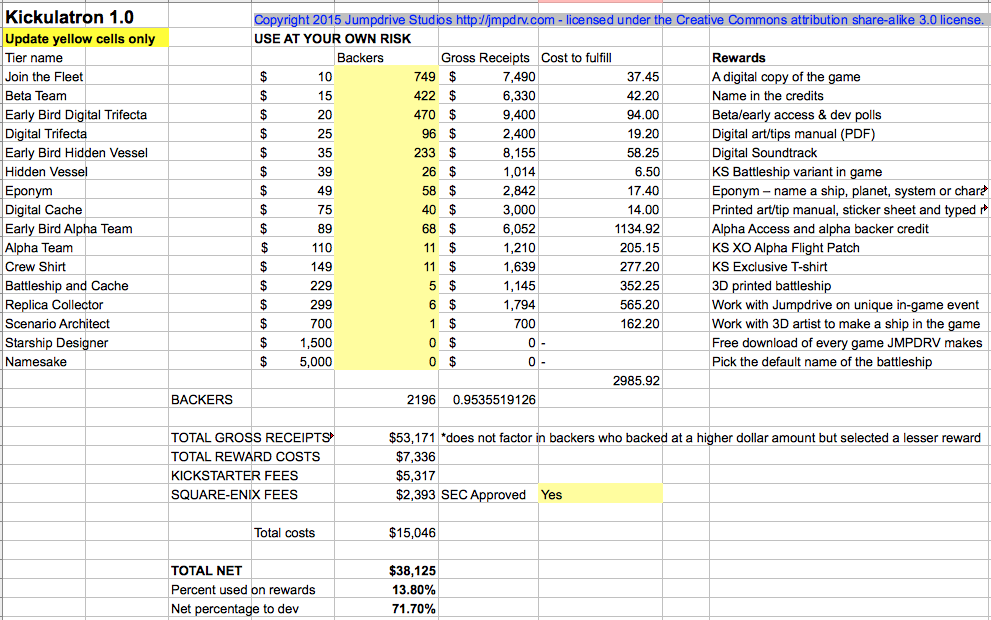
I ran several scenarios of different groups of backers using real data distributions from other campaigns before I settled on the right pricing and reward mix. I also tried several combinations of different numbers of backers in different tiers that we’d need to reach our minimum funding, 1.5x funding, double and triple funding to make sure the total net and numbers of rewards to fulfill worked for us in all those situations. Folks have lost lots of money on both ends of the success spectrum, and I didn’t want that to happen to us.
XO was approved by Square Enix Collective, which you can read more about here. We got a lot out of the experience and I would absolutely do it again – but if you’re not Collective approved you’ll want to change the SEC dropdown to No.
And now some final analysis: Our campaign was successful, but not wildly so. Thanks to Kickulatron, our total estimated cost for rewards came to less than 14% of what we raised, which I think is pretty ding-dong good.

Even better, some of our actual costs will be lower, since I priced our rewards without quantity discounts. For example, Alpha patches will cost substantially less per item because we have a large enough order for a quantity discount. We also raised more than shown on the gross due to international shipping and some backers generously giving us money and selecting a lesser reward (or no reward at all). A special thank you to those backers!
Probably the worst news is that we sold very few shirts, making the cost per shirt quite high. Design is the majority of the cost, so I suppose I could have just thrown a shirt together with art on hand and gotten the price per shirt down to $11 or so. But I feel that everything Jumpdrive does, says, and creates reflects on the game and who we are as a team. So I am investing in a talented outside artist to produce a great design. I plan to print extra shirts to (hopefully) sell at events and offset those costs further. There’s also a small chance the shirt could be commercially successful on it’s own, and we’re exploring different opportunities to get XO merchandise out there.
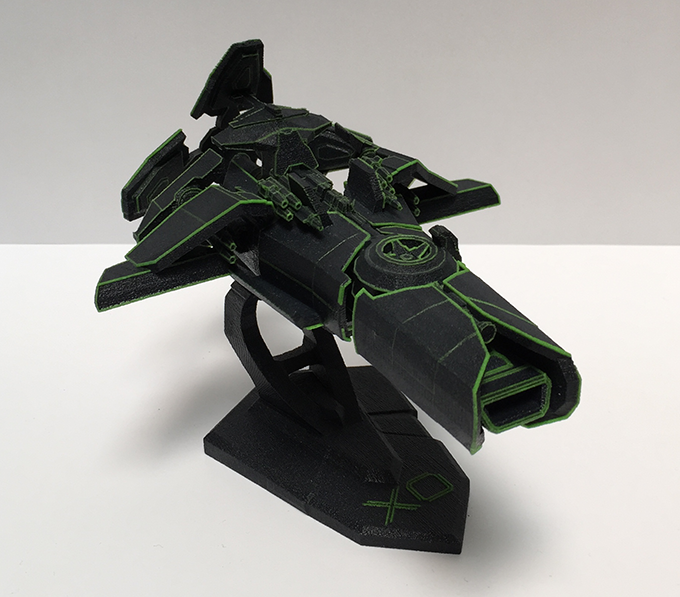
The reward that I wanted the most was the one I also worried about the most: the 3D printed battleship. The process took several months of evaluating 3D printing technologies, talking with different vendors, working with them on the model, and working out the contractual details. Once I had a beautiful model in hand and a contract in place to produce them, all my worries were gone. My gladness cannot be measured at doing this work in advance. And also at making the decision to work with experienced professionals. I really could have been in trouble on price – they are very expensive to do right. We didn’t sell as many as we hoped, but I hope that people will want to buy them after the game is done.
I hope you find Kickulatron as useful as we did! Please drop me a line if you end up using it or making it better.
– Brian Jamison
@jmpdrv